Destructive testing of used aerial fabric
on The Machine That Breaks Things
Phil Servita
aerialist at frobmob dot org
May 2007
Last updated: 14 july 2007
Fabric #2: 60 inch (nominal) wide Polyester Knit
(single weft knit weave)
The second fabric tested was provided by Laura Witwer. This fabric
had been purchased from Unicycle.fr in 2000.
age of fabric/usage: 7 years old, used in around 25 shows and literally
hundreds of class hours over two years (guestimated 500 hours of class time).
Material composition and weave type were unknown when the fabric was shipped
to me. Fabric was retired because it was showing significant signs of wear
(scalloping around the edges, less stretch, etc.)
Burn Test.
A sample of the fabric was ignited. While in the ignition source, it
burned with a black smoke and smelled somewhat acrid and sweet. It dropped
melted drops which hardened into
a black residue. When removed from the ignition source, the sample would
self-extinguish in a short time period.
Under the microscope there seemed to be only one type of fiber. Microscope photo of fabric. The yarn is a spun
type and is made of approximately 20 individual fibers.
Composition of this fabric is almost certainly 100% polyester.
Only a single side photo is needed to determine weave type here, this one
is a very simple Single Weft Knit.
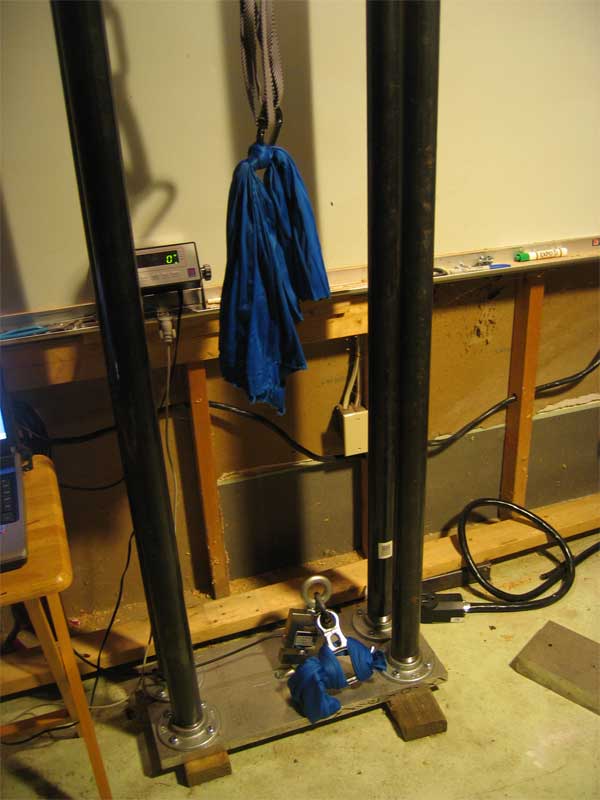
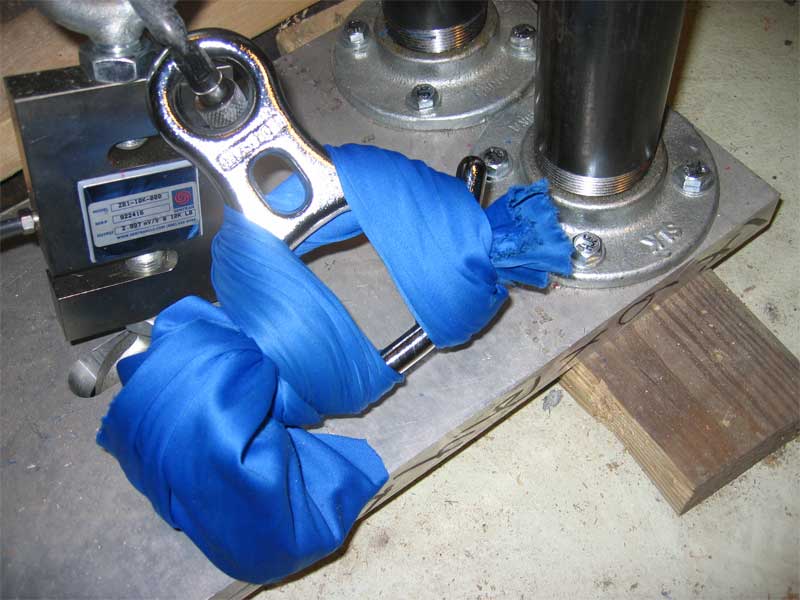
TestSetup
The fabric was tested to destruction using The Machine That Breaks Things,
a home-brew tensile stress tester. 8-foot sections of the fabric bolt were
taken, from various sections along the length of the fabric. One end of the fabric was tied off to a steel caribiner (an Omega screwgate D)
and the other was rigged in a commonly rigged fashion on a stainless steel
Rescue 8, using a commonly used method documented
Here (Aircat handout) and Here (Nimble Arts handout).
For more details on the rigging method, see the photos in the test details for Fabric #1.
When done, we now have this:
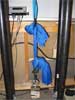
Note that we are only testing a single side of fabric. I wrapped the free end
on the rescue-8 side through the large hole of the 8 a couple of times such
that there was less free fabric lying around.
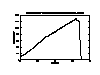
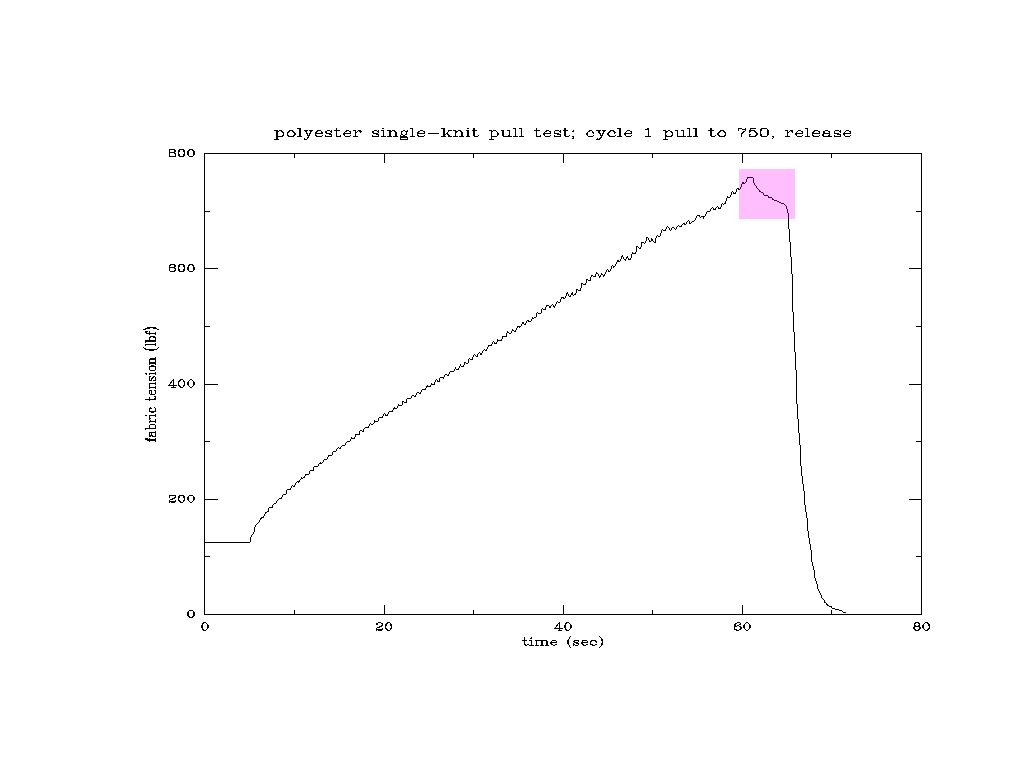
The Actual Pull Test
OK. Lets start pulling. after an initial stressing to 300 to set everything,
we start slowly increasing until either badness happens, or we reach a tension of 750.
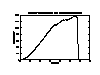
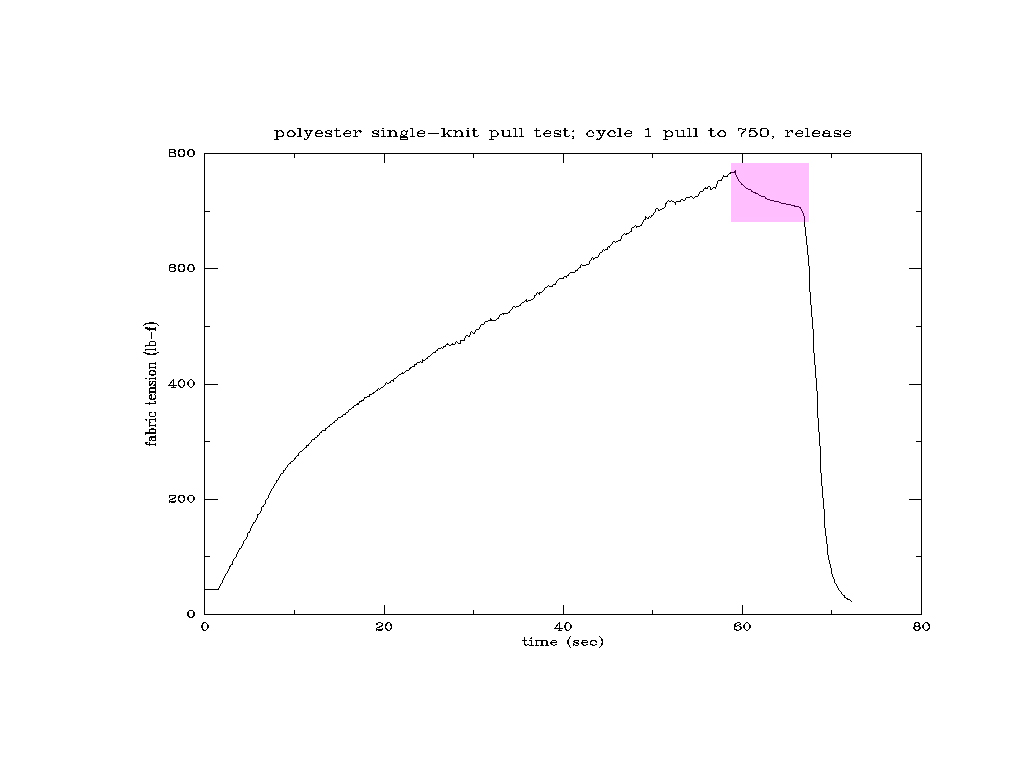
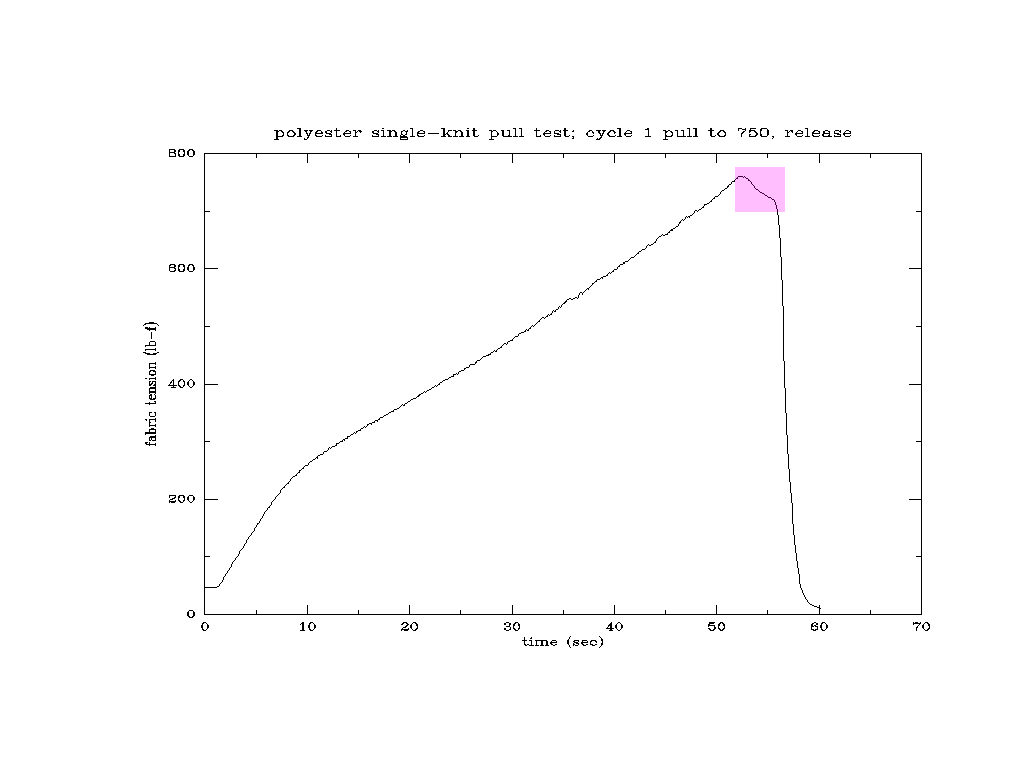
Graph of Cycle 1.

No badness was observed or heard in this cycle. The pink rectangle highlights
the region where i stopped increasing the tension in the system, but had not
actively released tension yet. This type of fabric also seems to exhibit the
same self-tension release behavior as Fabric #1, and the release curve is
similarly inverse-exponential looking.
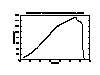
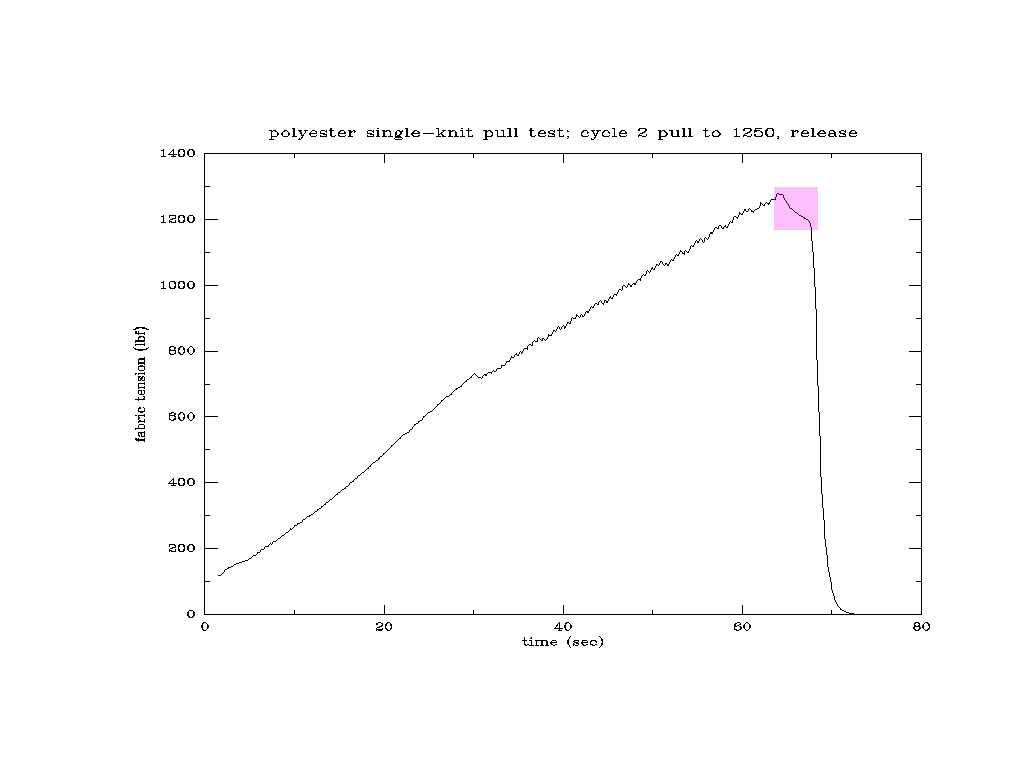
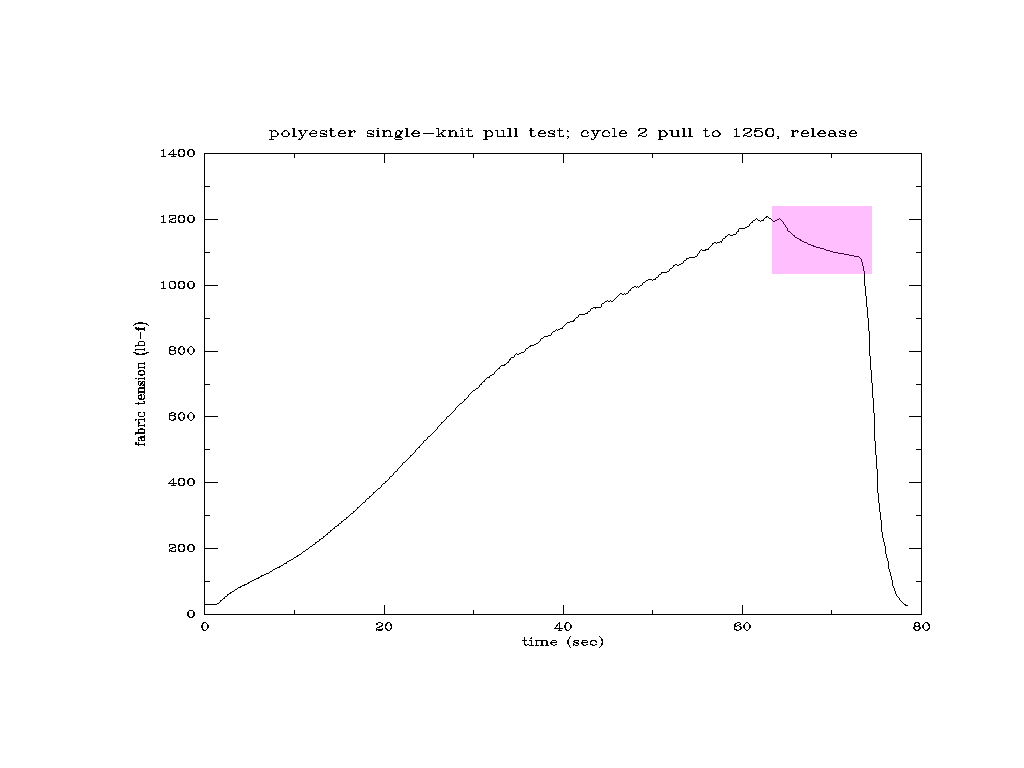
Second tension cycle. We pull until we reach a tension of 1250, or until
badness happens.
Graph of Cycle 2.
Some creakyness is heard as we get close to 1200, but nothing really notable
happened.
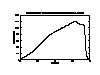
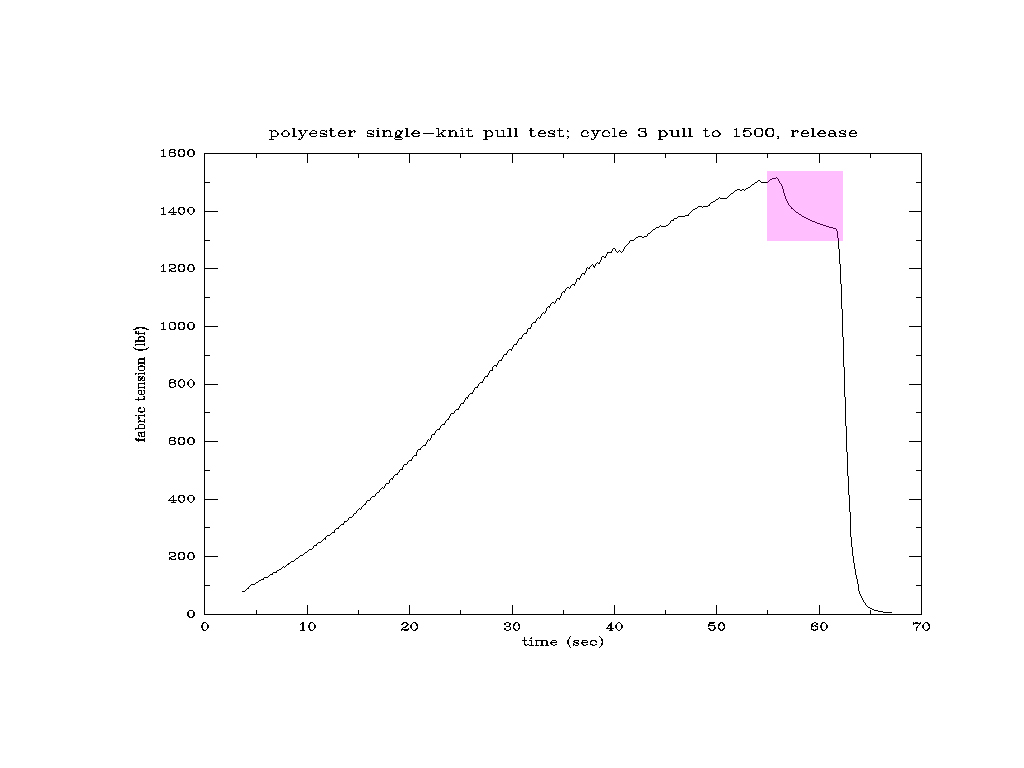
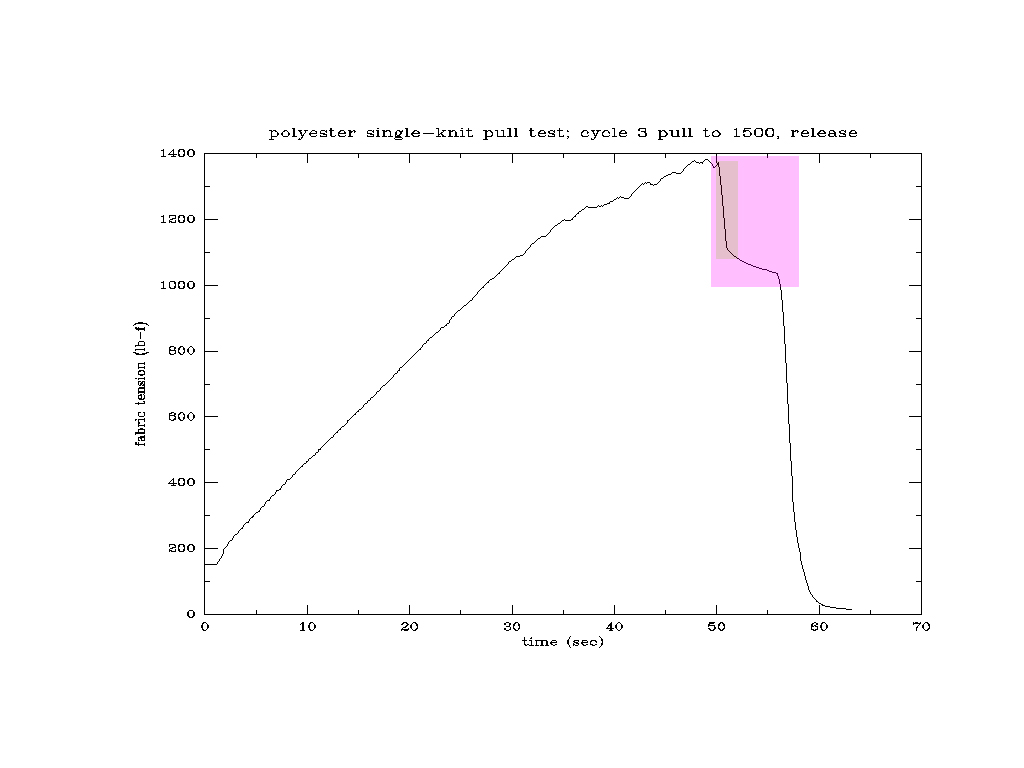
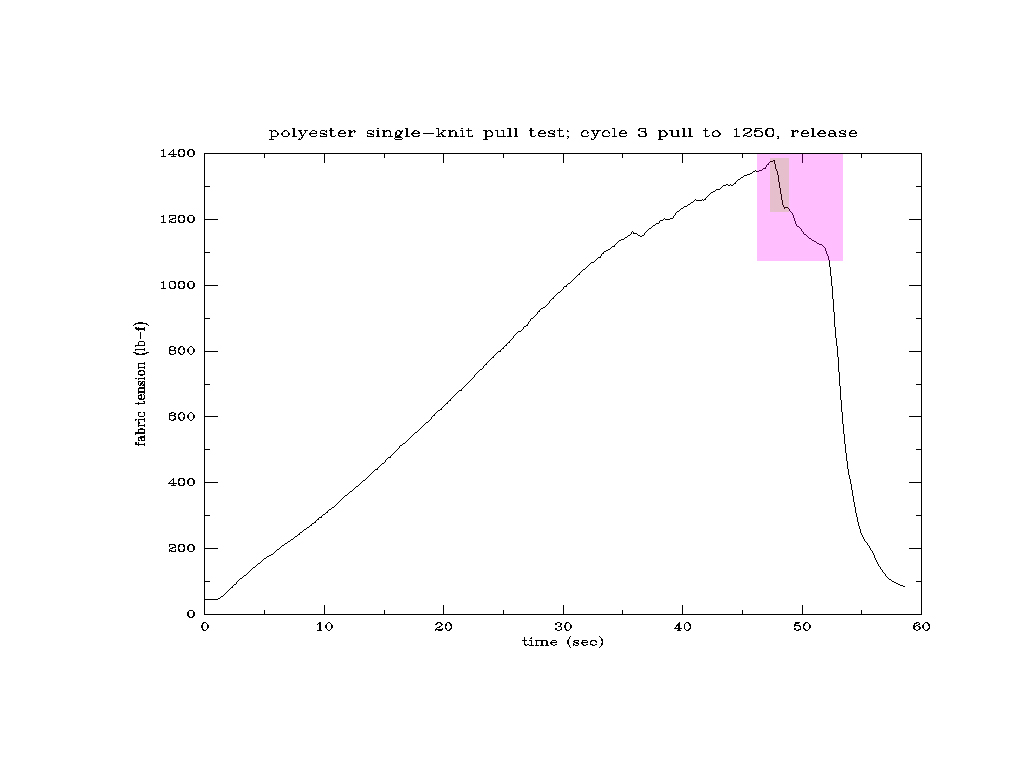
Third tension cycle. We pull until we reach a tension of 1500, or until
badness happens.
Graph of Cycle 3.
A light pop is heard at about 1280 or so, but tension holds mostly steady,
so we kept going. We made it to 1500, but there are noceable creaks and pops
and it's clear the fabric isnt happy there.
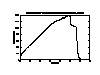
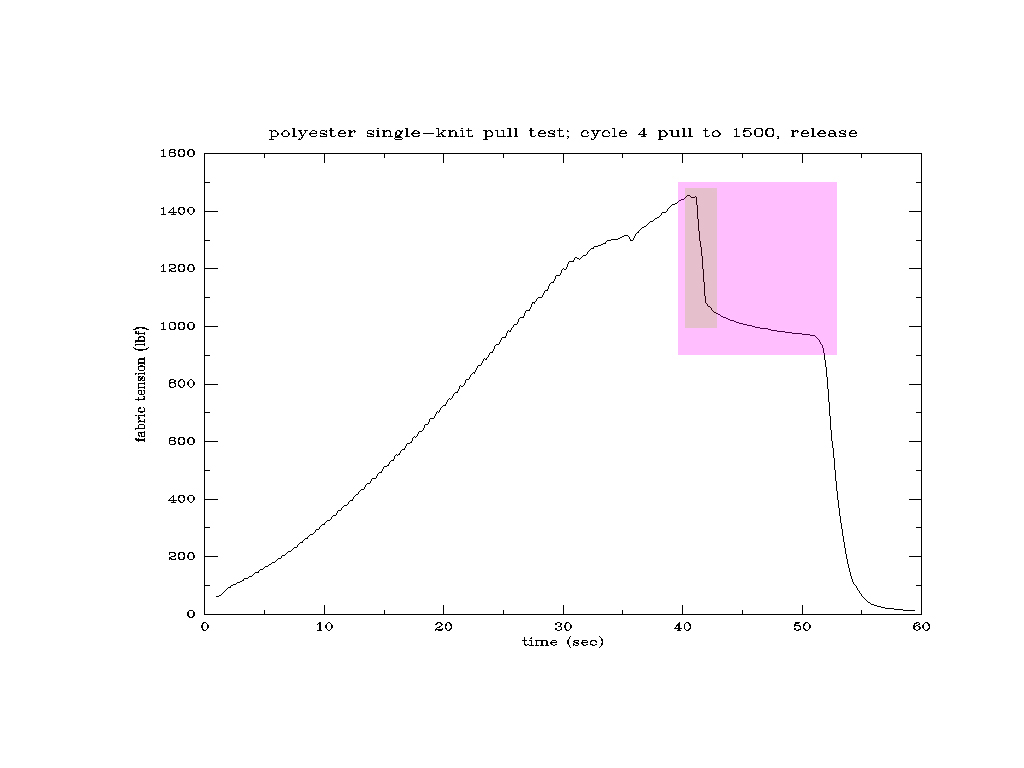
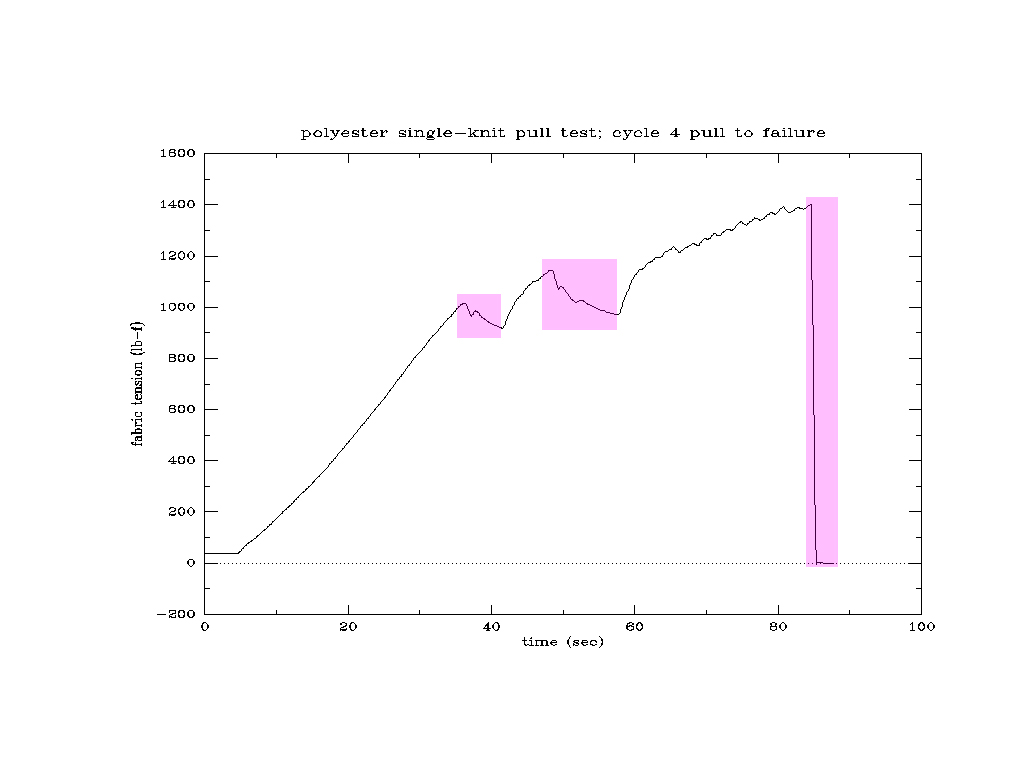
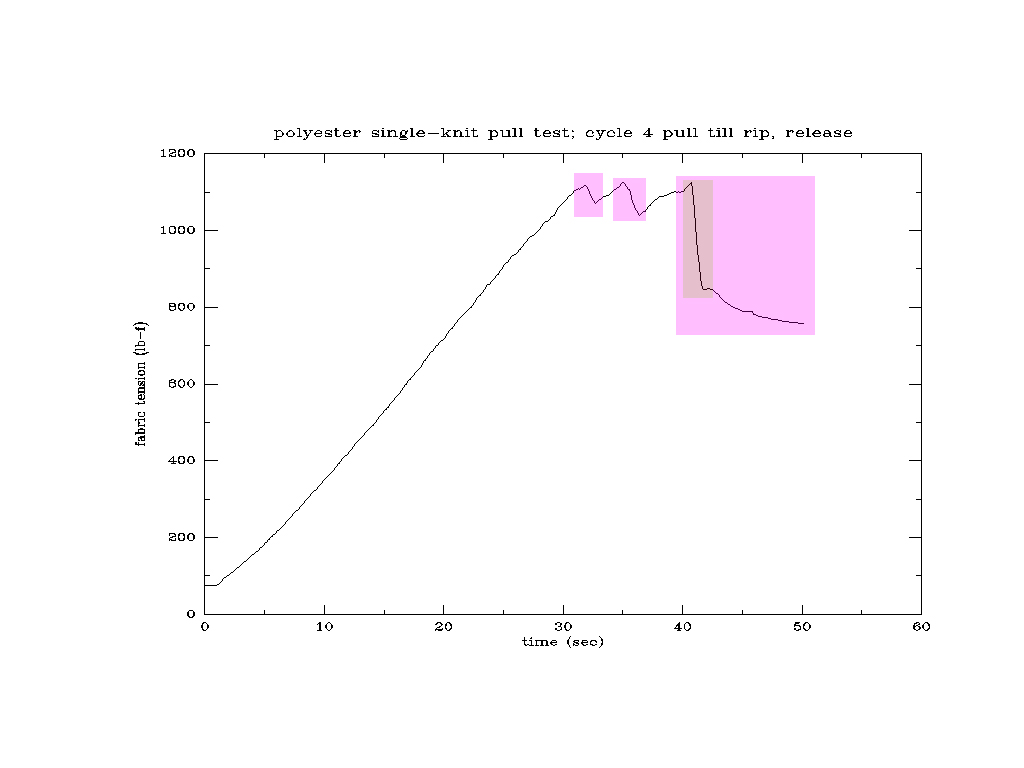
Fourth tension cycle. We pull until we reach a tension of 1500, or until
badness happens.
Graph of Cycle 4.
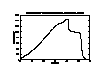
We dont make it to 1500. Noticeable badness occurs at 1430, and a noticeable
rip appears in the fabric. Tension drops to 1050 or so, and then holds steady.
The grey rectangle within the pink rectangle shows the rip occurring. The
failure is about .8 seconds in duration.
We then release tension and prepare for cycle 5.
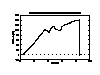
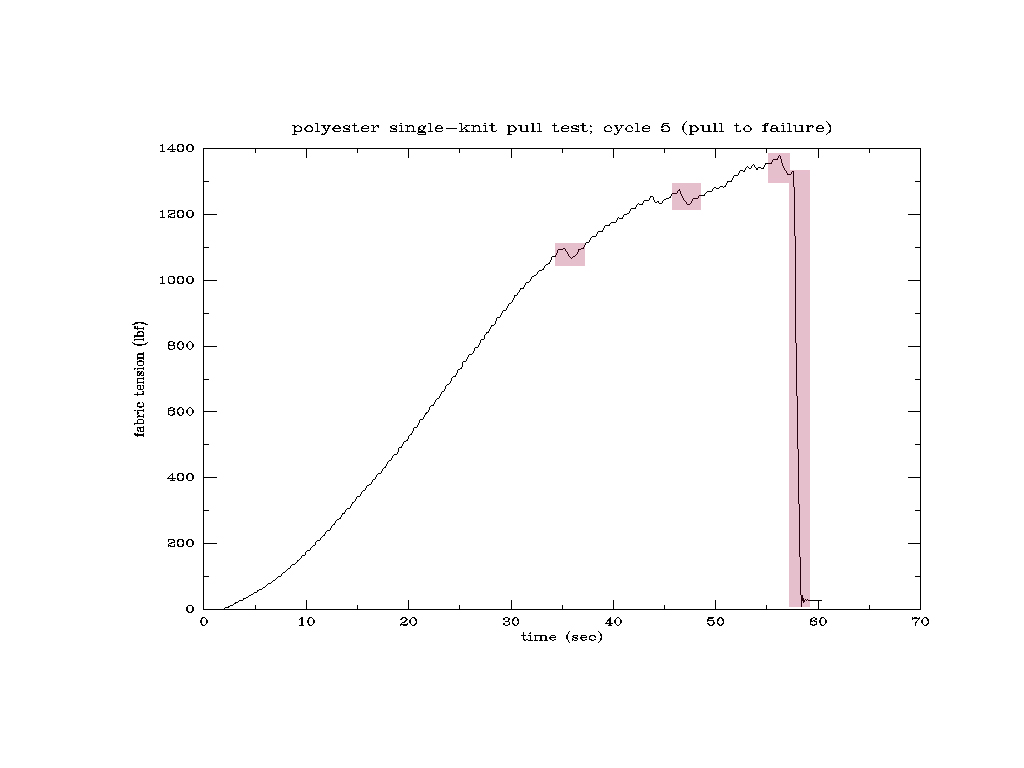
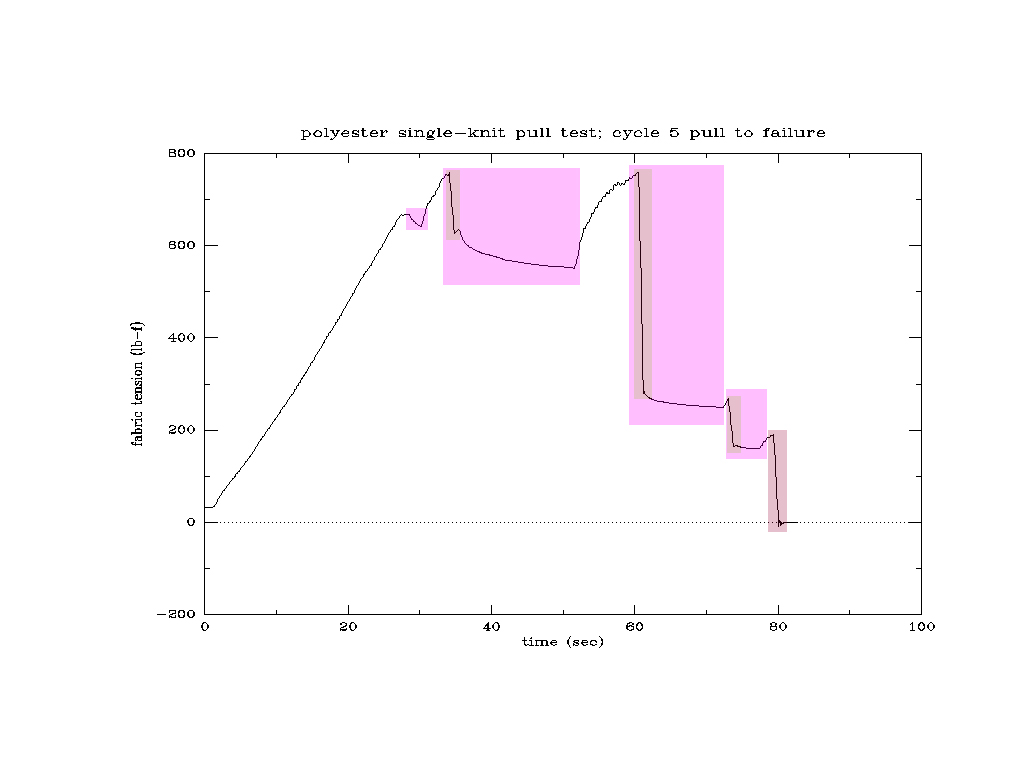
Fifth tension cycle. We pull until the fabric fails completely.
Graph of Cycle 5.
Three smaller failures occur at 1090, 1275, and about 1380, before the final
complete failure occurs 57 seconds in.
Photo of fabric just after failure
Fabric failure appeared to start from the
D biner knot,
though lesser damage was also seen
at the 8.
In this photo, we can
see how the failure propagated directly across the
weft line of the fabric. Due to the way weft knit fabrics are constructed, my
suspicion is that it is much easier to have a failure propagate across the
entire fabric than with a warp knit construction.
In this photo, we see the
fabric sample laid out flat on the floor, and can see how the failure consists
of two tears directly across the weft line in separate sections.
microscope shot of a section of the fabric at the rip line.
The final numbers from section #1:
cycle 1: OK up to 750.
cycle 2: OK up to 1250. Some creaky noises indicating that maybe we shouldnt stay here too long.
cycle 3: light pop at 1280, then OK up to 1500.
cycle 4: partial failure at 1430, tension dropping to 1050 and holds steady. there,
cycle 5: minor failures at at 1090, 1275, and about 1380, then complete failure at 1330.
Pull test of section number 2:
OK. Lets start pulling. after an initial stressing to 300 to set everything,
we start slowly increasing until either badness happens, or we reach a tension of 750.
Graph of Cycle 1.

Nothing notable occurs.
Cycle 2. Pull to 1250, or until badness happens. then release.
Graph of Cycle 2.
Again, nothing notable happens.
Cycle 3. Pull to 1500, or until badness happens. then release.
Graph of Cycle 3.
Fabric sustains a failure at 1346, tension stabilizes at about 1100. tension
released and we move on to cycle 4.
Cycle 4. Pull to 1500, or until badness happens. then release.
Graph of Cycle 4.
Fabric sustains failures failures early on at 1000 and 1100, but does not
fail complelely yet. We continue pulling; at 1400 the fabric fails completely. Failure occured at the 8.
The final numbers from section #2:
cycle 1: OK up to 750.
cycle 2: OK up to 1250.
cycle 3: partial failure at 1346, tension dropped to 1100 and held steady.
cycle 4: partial failures at at 1000 and 1100, then complete failure at 1400.
Pull test of section number 3:
Cycle 1; pull till 750, release.
Graph of Cycle 1.
Nothing notable occurs.
Cycle 2. Pull to 1250, or until badness happens. then release.
Graph of Cycle 2.

Again, nothing notable happens.
Cycle 3. Pull to 1500, or until badness happens. then release.
Graph of Cycle 3.

Fabric sustains a failure at 1379, tension stabilizes at about 1100. tension
released and we move on to cycle 4.
Cycle 4. Pull to 1500, or until badness happens. then release. We dont expect to get to 1500, based on the last pull:
Graph of Cycle 4.
Fabric sustains 2 small failures, both at about 1100, but does not
fail complelely yet. We continue pulling; a third failure again at around 1100
is much more substantial. fabric tension stabilizes at about 750 and we release
tension then. (graph incomplete - i hit the "stop logging" button
inadvertently before letting tension out)
Cycle 5. Pull until failure.
Graph of Cycle 5.
The fabric tension never makes it over 800; a small and large failure occur
at close to 750, followed by total failure at about 200.
The final numbers from section #3:
cycle 1: OK up to 750.
cycle 2: OK up to 1250.
cycle 3: partial failure at failure at 1379, tension stabilizes at about 1100
cycle 4: two partial failures at 1100, stabilizing at 750.
cycle 5: two failures at 750, followed by complete failure at 200.
Discussion.
Once again, the fabric gave plenty of warning before complete failures occured.
Note, however, that this fabric failed at significantly lower tensile stress
than the tricot samples of Fabric #1. It also sustained fewer noticeable
failures before completely breaking in two.
It might be tempting to look at the figures and claim that the safety margin
of a fabric of this weave type is 50% of the margin you would get with a warp
knit such as fabric #1, but that does not take into account the extra wear
on this fabric, or that two samples does not an ironclad case make.
More importantly, that also wouldn't take into account the fact that any given
drop performed under identical conditions, the only difference being
which of the two fabrics it was done on, would produce less tensile stress
on this fabric than the previous Tricot sample; that's exactly *why* folk
choose "medium stretch" fabrics at times; they're easier on the body for those
longer drops. Whether that difference is enough to make up for the strength
difference is a question for further investigation. Testing apparatus for
such investigations is currently under construction.

